Create a Checkout
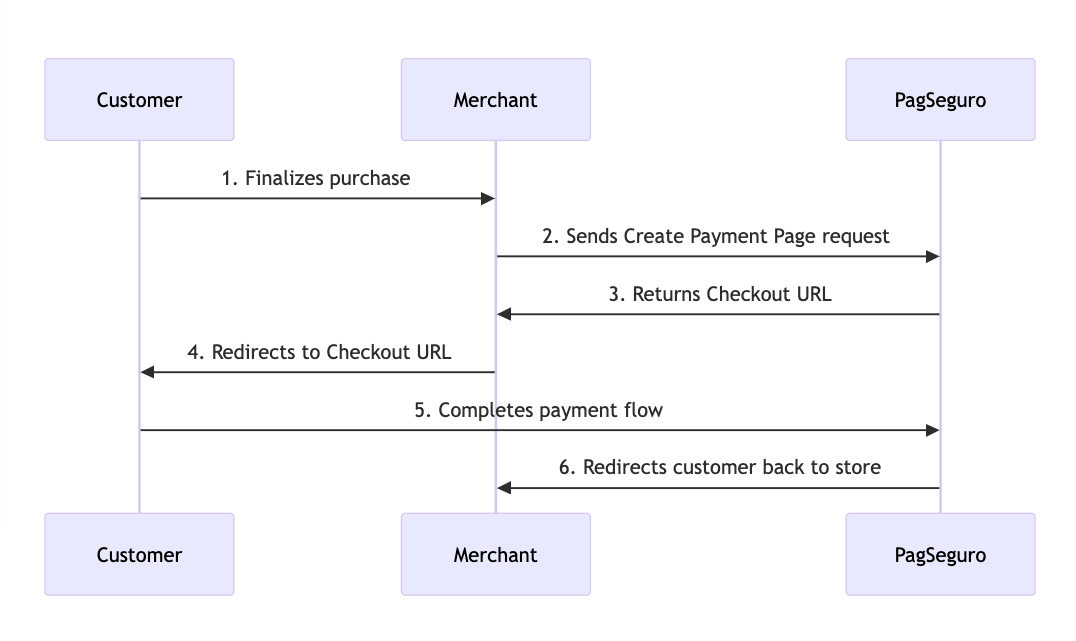
Once your customer finalizes their purchase on your website, you can create a checkout through the Create a Payment Page endpoint. This will generate a URL to redirect your customer to finish their payment. You can find a detailed diagram explaining this flow below.
Checkout Flow

-
Customer → Merchant: Customer finalizes the purchase through Merchant Store.
-
Merchant → PagSeguro: Merchant sends a Create a Payment Page request to PagSeguro with the Customer's data.
-
PagSeguro → Merchant: PagSeguro processes the requested data and returns a Checkout URL to the Merchant.
-
Merchant → Customer: Merchant redirects Customer to the Checkout URL generated by PagSeguro.
-
Customer → PagSeguro: Customer completes the payment flow at PagSeguro Checkout.
-
PagSeguro → Merchant: PagSeguro redirects the customer to the Merchant Store.
Follow the steps below to create a checkout:
Step 1: Collecting Necessary Data
To create a checkout, you will need some of the customer's, your company's, and the order's data. The Create a Payment Page endpoint page provides a comprehensive list of the needed information.
Step 2: Submitting Create Checkout Request
With all the mandatory information at hand, you will need to submit a POST request to the Create a Payment Page endpoint. This request should contain the integration, order, checkout, charge and payer objects. In the charge object, you can inform checkout payment settings. The type attribute allows you to select the category of payment methods that can be used to finalize the checkout.
Below, you can find examples of different types of requests.
{
    "integration": {
        "reference": "REF-XXX-1234567890",
        "notification_url": "https://www.merchantwebsite.com/notify?type=transaction",
        "project": 1
    },
    "order": {
        "currency": "BRL",
        "items": [
            {
                "quantity": 1,
                "description": "Product description",
                "unit_price": 101.1
            }
        ]
    },
    "checkout": {
        "language": "pt_BR",
        "redirect_urls": {
            "success": "https://www.merchantwebsite.com/success"
        }
    },
    "charge": {
        "country": "BR",
        "type": "CREDIT_CARD"
    },
    "payer": {
        "email": "[email protected]",
        "person": {
            "name": "Mr. Payer",
            "birth_date": "1970-01-01",
            "phone": {
                "country_code": "55",
                "number": "44900000000"
            }
        }
    }
}
{
    "integration": {
        "reference": "REF-XXX-1234567890",
        "notification_url": "https://www.merchantwebsite.com/notify?type=transaction",
        "project": 1
    },
    "order": {
        "currency": "BRL",
        "items": [
            {
                "quantity": 1,
                "description": "Product description",
                "unit_price": 101.1
            }
        ]
    },
    "checkout": {
        "language": "pt_BR",
        "redirect_urls": {
            "success": "https://www.merchantwebsite.com/success"
        }
    },
    "charge": {
        "country": "BR",
        "type": "POSTPAY"
    },
    "payer": {
        "email": "[email protected]",
        "person": {
            "name": "Mr. Payer",
            "birth_date": "1970-01-01",
            "phone": {
                "country_code": "55",
                "number": "44900000000"
            }
        }
    }
}
{
    "integration": {
        "reference": "REF-XXX-1234567890",
        "notification_url": "https://www.merchantwebsite.com/notify?type=transaction",
        "project": 1
    },
    "order": {
        "currency": "BRL",
        "items": [
            {
                "quantity": 1,
                "description": "Product description",
                "unit_price": 101.1
            }
        ]
    },
    "checkout": {
        "language": "pt_BR",
        "redirect_urls": {
            "success": "https://www.merchantwebsite.com/success"
        }
    },
    "charge": {
        "country": "BR",
        "credit_card": "VISA"
    },
    "payer": {
        "email": "[email protected]",
        "person": {
            "name": "Mr. Payer",
            "birth_date": "1970-01-01",
            "phone": {
                "country_code": "55",
                "number": "44900000000"
            }
        }
    }
}
Inform Type or Method of Payment
It is mandatory to inform the type or method of payment in the
chargeobject. It's not possible to inform both simultaneously.
Step 3: Directing Customer to Checkout URL
The response will return a code parameter, used for internal PagSeguro tracking, a url parameter with the checkout URL you should redirect the customer to, a created_at parameter with the checkout creation date, and an expires_at parameter with the checkout expiration date. You can see a Response example below.
{
    "code": "5be8a351f5bc4e33ae92dd4b860db314",
    "url": "https://payment.boacompra.com/5be8a351f5bc4e33ae92dd4b860db314",
    "created_at": "2021-04-12T12:43:13Z",
    "expires_at": "2021-04-12T12:45:13Z"
}
You need to direct your customer to the Checkout URL to finish the payment process.
Checkout URL Expiration Time
The checkout URL has an expiration time and it should be exposed to the Customer as soon as it is generated. The expiration time varies, being 2 minutes for Checkout 2.0 and 15 minutes for Checkout 1.0.
Updated 8 months ago
