
Create a PostPay Transaction
PostPay is a cash-based payment method popular across Latin America. It allows customers to order products online and pay later at designated establishments. However, this payment option may not be ideal for perishable goods or time-sensitive services.
Boleto Bancário (Brazil)
| Payment Method | Countries | Refunds | Recurring | Chargebacks | Type | Sub-Type |
|---|---|---|---|---|---|---|
| Boleto Bancário | BR | Yes | No | No | postpay | boleto |
To create a boleto payment, you will use the following parameters in the payment-method object:
- Type:
postpay - Sub-type:
boleto
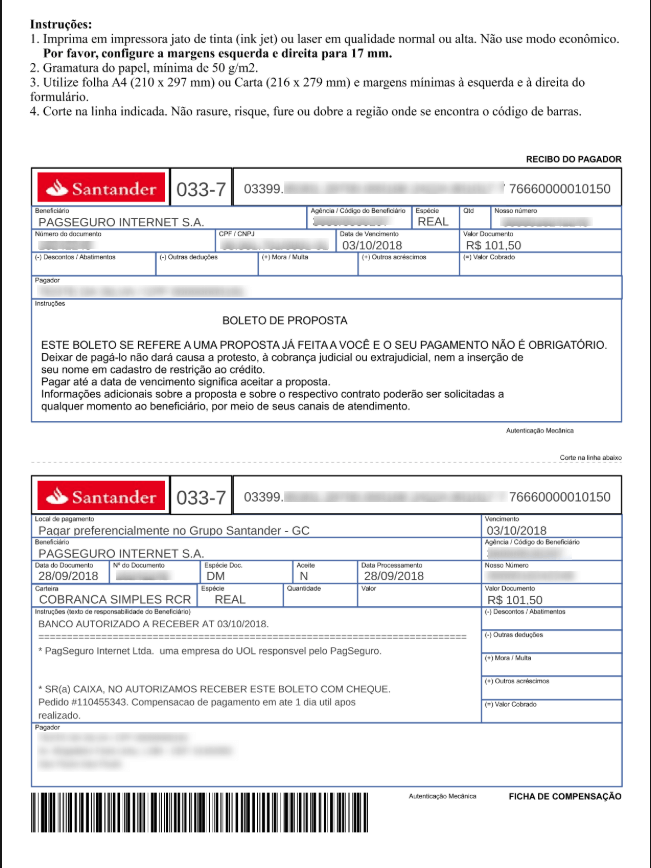
Boleto Bancário is a financial document issued by a bank in Brazil. It includes:
- Issuer bank information
- 44-digit ID field (same data as the barcode)
- Barcode
- Payable amount
Below, you can see an example of boleto:
Customers can pay boletos at ATMs, banks, authorized retailers, or via online banking. PagSeguro receives payment confirmation from the bank within one business day. However, it can take 3–6 business days if there are holidays. Unpaid boletos remain open for 8 days in the PagSeguro dashboard.
When the boleto is created, PagSeguro returns a URL in the payment-url field. This URL links to a printable version of the boleto for customer payment.
Supported Boleto Issuers
Only registered boletos from Safra, Santander, and Caixa Econômica Federal are supported.
PostPay Payment Workflow
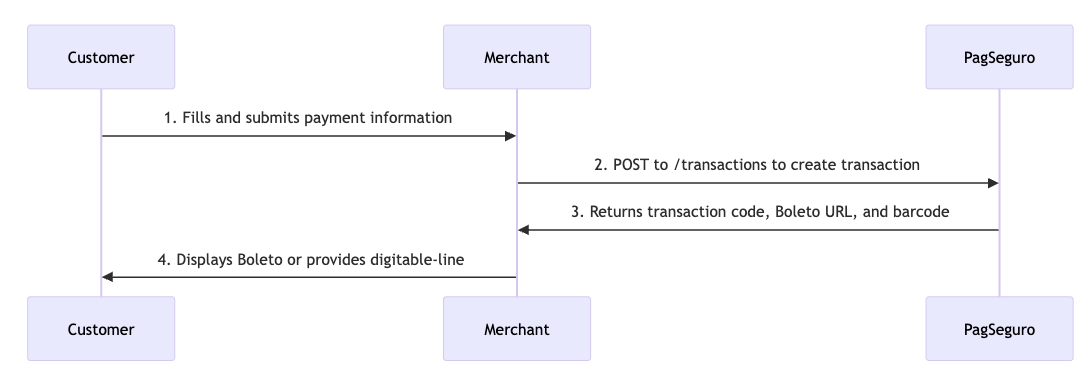
- Customer → Merchant: Fills and submits all necessary payment information.
- Merchant → PagSeguro: Submits information to Create transaction to create the transaction.
- PagSeguro → Merchant: Creates order and returns the transaction code, Boleto URL, and barcode number to the merchant.
- Merchant → Customer: Displays the Boleto to the customer using the PagSeguro Boleto URL or provides the digitable-line to the customer.
Follow the steps below to create a boleto payment:
Step 1: Collecting Customer's Information
Before initiating the payment, you need to collect all necessary information from the customer. This includes basic details such as their name, email, birth date, contact information, and address. Make sure that all fields are correctly filled out to avoid any issues during the payment process.
Delivery Address
Payer address is required when the cart item type is
physical.
Step 2: Requesting a PostPay Payment
After the customer sends their information, you can use the Create transaction endpoint to submit it to PagSeguro.
Below is an example request and response:
{
  "transaction": {
    "reference": "REF-XXX-1234567890",
    "project-number": 1,
    "country": "BR",
    "currency": "BRL",
    "checkout-type": "direct",
    "notification-url": "https://billing.checkout.com/processing",
    "language": "pt-BR"
  },
  "charge": [
    {
      "amount": 100.00,
      "payment-method": {
        "type": "postpay",
        "sub-type": "boleto"
      }
    }
  ],
  "payer": {
    "name": "John Doe",
    "email": "[email protected]",
    "birth-date": "1988-12-25",
    "phone-number": "+5511987654321",
    "document": {
      "type": "CPF",
      "number": "00000000191"
    },
    "address": {
      "street": "Rua Teste",
      "number": "1102",
      "complement": "AP 302",
      "district": "Bairro dos testes",
      "state": "PR",
      "city": "Maringá",
      "country": "BR",
      "zip-code": "87030000"
    },
    "ip": "200.221.118.80"
  },
  "shipping": {
    "cost": 0,
    "address": {
      "street": "Rua Teste",
      "number": "1102",
      "complement": "AP 302",
      "district": "Bairro dos Testes",
      "state": "PR",
      "city": "Maringá",
      "country": "BR",
      "zip-code": "87030000"
    }
  },
  "cart": [
    {
      "quantity": 1,
      "description": "Calça Jeans",
      "category": "Collectibles",
      "type": "physical",
      "unit-price": 1
    }
  ]
}
{
  "transaction": {
    "code": "111116875",
    "reference": "REF-XXX-1234567890",
    "amount": 100.00,
    "status": "PENDING",
    "currency": "BRL",
    "country": "BR",
    "payer-email": "[email protected]",
    "date-created": "2018-10-09T11:13:37.54658934-03:00",
    "barcode-number": "03399767800000001009853029700000167460590101",
    "digitable-line": "03399853012970000016874605901011976780000000100",
    "payment-url": "https://payment.boacompra.com/b/OXBJSUwzUUNwSm84aHVlbXdqaXRuQT09"
  }
}
Reason Codes
If the request fails, the API will return an HTTP status code other than 200. The response body will include an
errorsarray with descriptive messages and corresponding error codes.For the full list of possible error codes, see the Reason Codes reference.
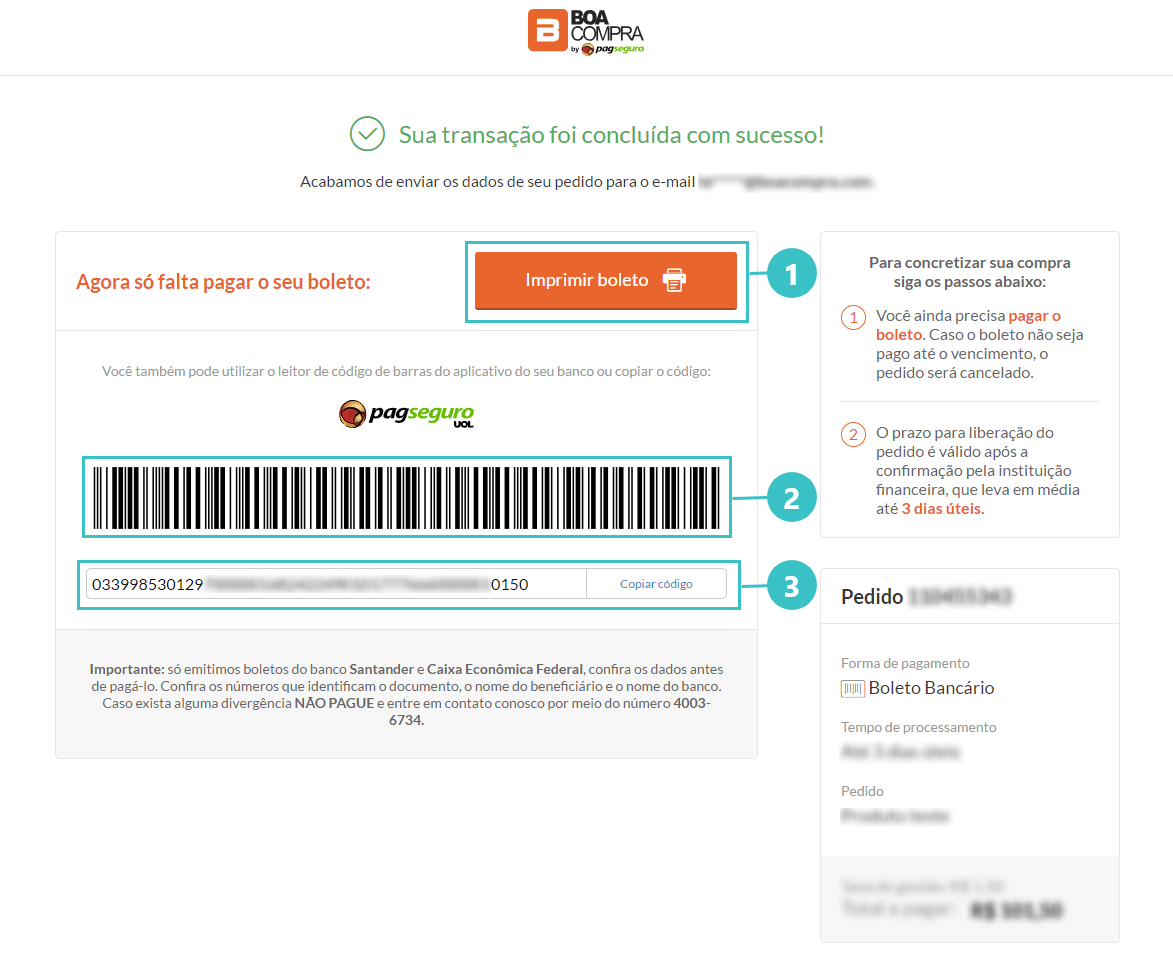
Step 3: Displaying Boleto Data to Customer
After PagSeguro processes the transaction and generates the boleto, you will receive a response containing essential data to guide the customer in completing the payment.
payment-url: This URL links to the printable version of the boleto. You should display this URL to the customer so they can complete the payment process.barcode-number: Use this to display the barcode on your website. The barcode is scannable at ATMs, banks, and authorized payment locations.digitable-line: This is an alternative to the barcode. It allows customers to manually enter the payment code through online banking.
Be sure to provide clear instructions for the customer on using these options. You can redirect them to the PagSeguro boleto page or offer them the barcode and digitable-line for manual input.
Best Practices
To improve conversion for boleto payments, we recommend:
1. Adding a Confirmation Page
Always show a confirmation screen after the boleto is generated.
2. Offering a Print Option
Some users prefer printing the boleto to pay at an ATM or bank.
3. Providing the Barcode
Allow scanning via banking apps. Use barcode-number with libraries like JsBarcode.
4. Offering Copy-Paste of Digitable Line
Enable customers to copy the payment code (digitable-line) for easy online payment through their bank.