Token Credit Card Payment
The Token Credit Card payment method enables merchants to process transactions using a secure token generated for the customer's credit card details. This method helps to avoid storing sensitive payment information while ensuring compliance with PCI DSS standards.
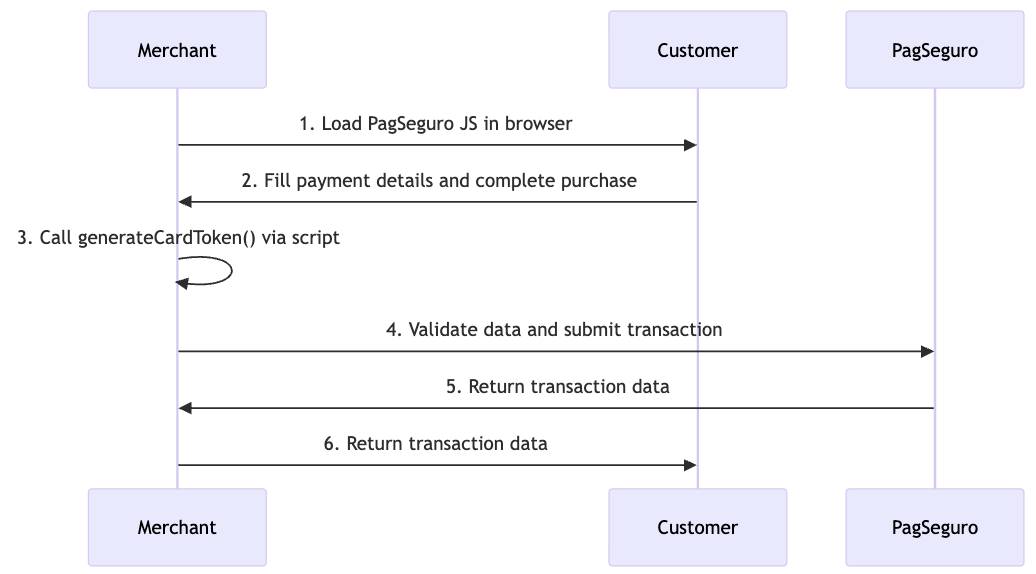
Token Credit Card Transaction Flow

- Merchant → PagSeguro: The merchant loads the PagSeguro JS into the website's browser.
- Customer → Merchant: The customer fills in the payment details and completes the purchase on the merchant's website.
- Merchant: The merchant calls the 'generateCardToken' method via the script and generates a secure token to transact the customer's card details.
- Merchant → PagSeguro: The merchant server validates the customer data and submits the transaction data to PagSeguro.
- PagSeguro → Merchant: PagSeguro processes the request and returns transaction data to the merchant server.
- Merchant → Customer: The merchant server returns the transaction data to the customer.
Follow the steps below to create a token credit card payment:
Step 1: Collecting Necessary Data
To initiate a tokenized credit card payment, collect the required data about the customer, order, and payment details. For the comprehensive list of parameters, refer to the Create a Transaction endpoint.
Step 2: Using the JS Credit Card Token Generator
PagSeguro provides a JavaScript library to securely collect credit card details and generate a token. The token can be used in the charge.credit_card.token field of the payment request.
-
Include the PagSeguro JS Script
First, add the PagSeguro JS script to your HTML page. This script will handle the token's secure generation.
<script src="https://stc.international.pagseguro.com/v3/international.pagseguro.min.js"></script> -
Generate the Credit Card Token
Create a
CardTokeninstance and call thegenerate()method to generate the token. Here's an example of how to implement it:<head> <meta charset="utf-8"> <title>PagSeguro Direct API Test</title> <!-- To include the PagSeguro JS in your payment page, you must insert a script tag with the JS file URL Script loaded with a dynamic parameter (?p=999999) value to invalidate the browser cache. --> <script type="text/javascript" src="https://stc.international.pagseguro.com/v3/international.pagseguro.min.js?p=999999"></script> <!-- You MUST instance the payment object ASAP after add the javascript on page, it will prevent loading time issues in the flow. --> <script type="text/javascript"> var cardToken = new InternationalPagSeguro.CardToken(); </script> </head> <body> <a href="javascript:generateCardToken()" target="_self">Click here to Generate the Card Token</a> <script type="text/javascript"> function generateCardToken() { // Example credit card data and format let card = { number: '5555666677778884', cvc: '123', expiration_month: '02', expiration_year: '2026', holder_name: 'Jonh Doe' }; // Use the content returned in the Promise to fill the token field in the API request cardToken.generate(card).then(cardToken => { console.info(cardToken); }).catch(err => console.log(err)); } </script> </body>This code will securely generate a token based on the credit card information entered by the customer on your site. The token is returned in the promise, which you can then use to submit the payment request.
-
Pass the Token in the Payment Request
Once the token is generated, use it in the
charge.credit_card.tokenfield of your API request, as shown below:Reference Pages for Supported Limits and Languages
You can check the reference pages for the maximum and minumum supported amounts, supported currencies, and supported languages.
{
    "integration": {
        "reference": "REF-XXX-1234567890",
        "notification_url": "https://www.merchantwebsite.com/notify?type=transaction",
        "language": "pt_BR"
    },
    "order": {
        "currency": "BRL",
        "items": [
            {
                "quantity": 1,
                "description": "Product description",
                "unit_price": 101.10
            }
        ]
    },
    "charge": {
        "country": "BR",
        "type": "CREDIT_CARD",
        "credit_card" :{
"token":"eyJkbmEiOiI2NzY3YzAxNDEzNGM0NTc4ODg0ZjU2MjdmYTI0ZGVhZiIsImlwIjoiMjAwLjIyMS4xMzAuNDkiLCJkZiI6ImNmYWI3MDcxMDJlZDQ4MjU4MzJhNmY2MDBhNWZjZjc2In0=",
          	"holder_name": "jonh doe",
						"store": true
        }
    },
    "payer": {
        "email": "[email protected]",
        "ip": "192.0.2.146",
        "person": {
            "name": "Mr. Payer Full Name",
            "birth_date": "1970-01-01",
            "document": {
                "type": "CPF",
                "number": "98765432101"
            },
            "phone": {
                "country_code": "55",
                "number": "44900000000"
            }
        }
    }
}
Reason Codes
If the request fails, the API will return an HTTP status code other than 200. The response body will include an
errorsarray with descriptive messages and corresponding error codes.For the full list of possible error codes, see the Reason Codes reference.
Step 3: Processing the API Response
After submitting the request, the API will return a response containing the transaction details. Below is an example of a successful response.
{
    "code": "25a58ef1-3755-476b-b2f6-e445b170a849",
    "reference": "REF-XXX-1234567890",
    "status": "PENDING",
    "amount": 101.1,
    "currency": "BRL",
    "country": "BR",
    "created_at": "2021-04-12T12:43:13Z"
}
Step 4: Handling Transaction Status
The status field in the response indicates the transaction state. You can monitor status updates using the notification_url or by querying the transaction status.
Updated 4 months ago
